
Several of you have asked me to post more photographs of Blue Creek Home.
And since everybody else seems to be cleaning and organizing after Christmas, I thought it would be a great time to get things in order and finish a few projects that I’ve had going way too long!!
I have been cleaning and rearranging things in our master bathroom in hopes of taking photographs this week and getting it posted first.
There is a shower curtain rod (AKA copper pipe) to cut off. A little grouting around the border tile needs to be done. The sinks need to be re-caulked. Lots of glass and mirror needs to be cleaned.
I was tired of cleaning, so this afternoon, I changed hats and started creating. It is so much more fun!!!
I have been wanting a romantic lamp on the dressing area, between our sinks.
I currently have a blackamoor lamp there. It is a bit small for the space, but it is perfect to hang necklaces and bracelets on. And , I like the look of it there. But, romantic he is not!
This lady statue made of a concrete-looking-resin has been residing on G-Man’s side of the counter. He has never appreciated her being on HIS side!! Well, I made him very happy when I took her away this afternoon…to make her into a lamp!!!
In the past, I have rewired a few lamps, dismantled a lot of them to use as something else, and turned candle holders into lamps. But, I have never started from scratch.
No fear, I got this!!
Let me say it was challenging and I had to Google a few things!! But, I did it!!!
And here’s how!

The statue
I lost the photos of the statue getting drilled. ARGHHH!!!!!
So just imagine me drilling a hole in her upper back, through her body (which is hollow) and out the bottom. I kept my drill as straight as I could so that the rod would be straight.
I centered the statue on the wooden base. I put white paint on the end of the threaded rod and then put it through the holes in the statue, onto the base. The paint marked the spot on the base where I needed to drill the hole.

Bad photo, but this is the paint that marks my drill spot.

This is the same drill bit that I used to make the holes in the statue.

I painted the base black.
After cutting the threaded rod to length, I inserted it from the bottom and secured it with a nut.

View of Base bottom

Next, I carefully guided the statue over the rod and onto the base.

I inserted the cord into the rod from the bottom.

After pulling the cord through to the top , I slipped the smooth metal rod (that I also painted black) over the threaded rod.

I was very pleased that it fit so nicely into the hole in her back!!

I added the bottom piece of the harp and the base of the socket which screwed on, serving to tighten everything. Then I fed the wire through the socket base.
Okay, at this point I got so excited that I forgot to take more photographs!!
So, we are skipping to the finished product!!! Sorry.
(There are good u tube videos that show you how to split and attach the wiring to the socket)
I went from this little guy…

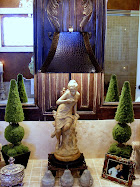
To this very French lady lamp!!!


And I like her a lot!!!
I will finish up my bathroom and post photos later this week.
This week I am linking to:
Metamorphosis Monday, Made it Mondays, Make It For Monday, Just Something I Whipped up, DIY Day, Get Your Craft On, Penny Pinching Party, Show and Tell.
Rhonda


Wow - this lamp looks great! Visting from BNOTP - I've enjoyed looking through your blog.
ReplyDeleteThis is very nice. I really like it.
ReplyDeleteI am truly impressed! Looks beautiful and very expensive!
ReplyDeleteJust simply beautiful! Men! They never appreciate the pretty stuff, huh? I am so impressed with your abilities to do this. Thanks for sharing, Barb
ReplyDeleteFantastic job! It looks beautiful!!
ReplyDeleteOMG!!! This is unreal fantastic!! I would never have even thought of making her into a lamp! Genius! Pure Genius!
ReplyDeleteGirl, I am so impressed!! I cannot WAIT to see the rest of the bathroom!
Lou Cinda
Wow - what a task and lovely end product! Lovely!
ReplyDeleteWow. That literally took my breath away. What a fantastic job you did!! I don't know why, but lamp projects always scare me... In fact, most electrical projects scare me. I usually con someone else to do them for me! THis is just so stunning. I am reminded once more why I follow your blog!
ReplyDeleteBeautiful! This looks very expensive!
ReplyDeleteWow, I am bowing down to you my lady. Well done and she turned out beautiful. Great job.
ReplyDeleteShe is a beauty. That is awesome that you made it! Projects like that are intimidating.
ReplyDeleteWow you are not scared to take on daring projects. Kuddos to you for doing all that yourself!
ReplyDeleteI am very impressed!
ReplyDeleteI can't believe it! YOU. ARE. AMAZING! I would never have thought to do that ~ that statue would have just been a statue to me.
ReplyDeleteWOW....beautifully done! Stunning piece to add to your decor. Can't wait to see your bathroom.
ReplyDeleteOh, you're so brave! This is beautiful lamp now!
ReplyDeleteWhat a gorgeous lamp. Love it. Hugs, Marty
ReplyDeletefantastic transformation!! Looks awesome!!
ReplyDeleterobyn
mysoutherncottage.com
Wow! I never would have thought that was a handmade lamp! Very nice and it probably saved you a couple hundred dollars to make it!
ReplyDeleteWow that is great. I would have been afraid I would I broke it. Thanks for posting to Made it Monday! Jules
ReplyDeleteHi Rhonda -
ReplyDeleteI'm Jennifer - Kelee Katillac's associate. We are haveing some email issues and can't find your address to send you the plexiglass project. Please contact me at jhanson@kc.rr.com!
Thank you, Jennifer
WOW!! Nice improvement! Way to go!
ReplyDeleteShe really does have that great vintage look to her -- brilliant lamp, really.
ReplyDeleteWow! That lamp sure is gorgeous now. Good job!...Christine
ReplyDeleteSo unique! Love the shade you used. What color is it?
ReplyDeleteRhonda, Thanks so much for your sweet comment on my french chair project. Your lamp is fabulous... wouldn't it look great with my chairs? Glad I found your blog!
ReplyDeleteWhat a beautiful lamp! Great job.
ReplyDeleteDaphne
What a beautiful LAMP and clever idea...she looks outstanding! Hope you have a HAPPY day!
ReplyDeleteBlessings,
Linda
Rhonda -
ReplyDeleteThis is great! So creative and clever. A beautiful and useful addition to your home.
- Deborah
I made a bunch of lamps with these wood bases -great job!!
ReplyDeleteI love it! How gorgeous...and she looks perfect as a lamp. Wiring a lamp is not as hard as it seems. You just have to follow the directions. Good for you!
ReplyDeleteThat looks like a $500 lamp. I agree that creating is so much more fun than cleaning.
ReplyDeleteI love it - she's beautiful!
ReplyDeleteBeautiful lamp, great job!
ReplyDeleteSandy
Wow Rhonda! That lamp is one gorgeous piece of DIY! And yes, it does not look "made-at-home" at all. Were you not concerned that the statue might split if you drilled? Did you take particular care to avoid that?
ReplyDeleteAll in all, Genius work!
Very pretty and ingenious. Did you get the tubing in the plumbing section?
ReplyDelete