I was asked to explain how I made the laundry tub skirt in my Blue Creek Chic Laundry Room.
DISCLAIMER!!! I am not a professional seamstress, nor am I a teacher...but here goes!!!
..............................................................................................................................................
Supply list:
3 yds. decorative fabric. Mine is from Hobby Lobby - $2.99 yd. - 30% off. Wash and dry it before you cut and sew it.
1 pkg. self stick velcro (cut to fit around your tub)
3 yds. burlap webbing (cut to fit around your tub)
8 - 1" buttons
..................................................................................................................................................

The burlap w/ red stripe webbing that I purchased for the band at the top was with the drapery pleater tape @ Hobby Lobby. It cost $.99 cents/yd. I think it's supposed to be used on the wrong side of draperies or as an upholstering stablizer???
I love the way it looks, so I used it as the banding at the top of my skirt.
............................................................................................................................................
Zig Zag the ends of the burlap webbing to stop it from fraying and attach the fuzzy side of the self stick velcro to the burlap tape. Mount the looped side of the velcro to the outside rim of the laundry tub. Attach the burlap webbing to the sink.
..................................................................................................................................................

While the burlap webbing is attached, mark it at the front corners, the middle of each side, and the middle front as indicated on the paper sample.
***Your webbing will be one continuous piece to which you will attach three separate fabric panels for easy access to storage below.
.................................................................................................................................................
Cut 3 panel widths of fabric to the measurement from the bottom of your mounted burlap webbing to the floor PLUS 2" or more for the seam allowance and small hem.
***My fabric is 45" wide. I only used 1 width (gathered) for each side of the laundry tub. If you want a fuller look, purchase 54"-60" wide fabric.
Finish both sides of the panels with a small, double hem.
I skipped this step because I loved the red selvege and wanted it to show.
....................................................................................................................................................
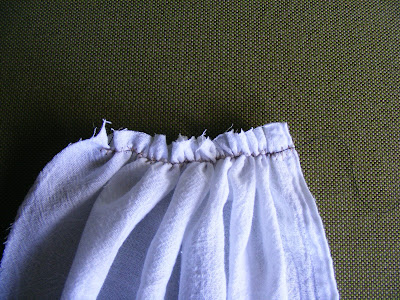
Mark the top center of all 3 cut panels. Using upholstery thread with a thick knot in one end, attach it to the top of a cut panel. Use a zig zag stitch to sew the upholstery thread across the top of the 45" cut panel. (do this on all three panels)

Click to enlarge for details
For contrast purposes, I used black thread instead of upholstery thread. Notice zigzag stitch running over the thread.

Pulling the upholstery thread easily creates the gathers, with no fear of the thread breaking. I love this method!
..............................................................................................................................................

This is a diagram representing the burlap webbing, showing the markings of a side mid-point and a front corner

Pin the fabric panel to the burlap webbing with right sides together, matching the end, mid-points, and front corners.

This is the fun part. Using the long tail of the quilting thread, slowly pull to create gathers, adjusting if necessary. When it is nice and taut, stitch it in place on the machine.
Repeat this step for the front panel and the other side panel.
Sew on buttons and make button holes.
Attach your skirt and mark the hem. I ironed my hem line, doubled the fabric and stitched it with a straight machine stitch.

...................................................................................................................................................
Please feel free to e-mail me at bluecreekhome@gmail.com if I have questions.
Rhonda


Rhonda, such a beautiful laundry tub skirt! I made one recently, almost the same way, except without the cute band and buttons. That really makes yours special. I had to laugh at your disclaimer, I too sew and am in no way an expert. Far from it in fact. I can and have sewn clothes etc, but yuck, I now stick to sewing for my home. I love sewing in a straight line :)
ReplyDeleteNow I have to find a sink in my house I can put a skirt around!!! This is the cutest thing!!! I love it!!! I love the webbing for trim!!! I may have to use that idea for something else...the wheels are spinning!!!
ReplyDeleteIt is always inspiring to visit here!!!
XOXO
Cathy
that's adorable
ReplyDeleteCheri
I just sewed a few pillows for my daughter today and I'm feeling like I could easily get that sewing bug all over again. I hadn't touch a sewing machine in 15 years, I think. If I do get the bug I'm going to try your skirt. It would make my laundry room just a little more appealing :)
ReplyDeleteI love the way it came out. Thanks for the instructions. I just found your blog and I'm really enjoying it. I wanted to invite you to participate in my giveaway, you have until Monday! Have a wonderful weekend!
ReplyDeleteThat is one cute skirt! I have one of those ugly, leggy laundry tubs. This would be perfect.
ReplyDeleteSuper cute! I'm getting ready to re-do my laundry room and I desperately need to cover my laundry tub, so I'm going to do what you did. Question: did you put buttons on just for looks or is it functional so you can get to what is under the sink? chessamoore at yahoo dot com
ReplyDelete