

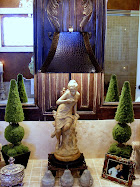
I am seriously crushing on this beauty

It is large - 22.75"w x 10"d x 31.5"h
and probably worth every penny of the $279.00 price tag
but...
too large for my need and too expensive for my wallet!
I want the feel of this but not so big - still on a stand but a little shorter and smaller.
I need something that I can use behind a low vignette to visually add dimension and height.
Inspiration was not very forthcoming with this project so the idea had settled into the crevices of my mind and I had moved on to other things. Last week I was browsing Ballard Designs website checking the sale section when I saw this:
EUREKA

was perfect for my project.
$69.99 on sale for $19.99. WHAT???
So, into my shopping cart it went -

- along with a few of these Venetian star ornaments
$12.50 each on sale for $4.99 each!
My box of Ballard goodies arrived and I got to work ASAP

My supply list:
Suzanne Kasler Sunburst Tree Topper (remove tree top attachment)
Venetian Star Ornament
Wooden Base (mine was base to a broken seashell stand)
1" wooden dowel
dark brown acrylic paint
Baroque Art Gilding Paste - Antique Gold
hot glue gun
 Directions:
Drill a larger hole in the base to fit the dowel (you can purchase raw wood bases)
Paint dowel rod and base dark brown.
Use gilding paste to add gold to dowel rod and the base
Tone down the gold finish on the Sunburst tree topper with brown paint
Glue dowel rod into base
Glue star ornament to the front of the sunburst tree topper
Fit a sunburst ray onto the dowel rod and glue in place.
- time to have fun -

Just what I needed to 'fill in' areas


I am going to make another one just like this one so that I can use them on each end of the mantle at Christmas.
Hope your week is lovely and creative!
Rhonda
Party at:
Coastal Charm Show and Share
Knick of Time Vintage Style Inspiration
A Stroll Thru Life Tabletop Tuesday
Savvy Southern Style Wow us Wednesdays
From My Front Porch To Yours Treasure Hunt Thursday
Hope your week is lovely and creative!
Rhonda
Party at:
Coastal Charm Show and Share
Knick of Time Vintage Style Inspiration
A Stroll Thru Life Tabletop Tuesday
Savvy Southern Style Wow us Wednesdays
From My Front Porch To Yours Treasure Hunt Thursday


Oh this is beautiful! It looks lovely being used on top of your beautiful chest.
ReplyDeleteMary Alice
It's beautiful, what a great idea! Thanks for the "how to". Love it!!
ReplyDeleteThank Leda. We should start a monthly craft day!
Deleteso clever! Love everything you do!
ReplyDeleteRobyn, you are so sweet to say that. Wish I had a fraction of your creativity girlfriend!
DeleteLove everything you do!
ReplyDeleteI love this, what a fabulous idea and it looks amazing in your vignette. Thanks tons for linking to Inspire Me.
ReplyDeleteLove it Rhonda! It turned out great and now I have a few goodies in my BD cart!;)
ReplyDeletePamela, it also looked good without gluing the smaller mirror on top of the large one. I used hot glue because I knew that I could pop it off and use them separately later - broke the tiny little mirror glass so now it's sort of permanent!
DeleteRhonda, This is very creative and I love your sun burst mirror. The Santos is wonderful too!
ReplyDeletexx,
Sherry
Rhonda, love your creations. Put your mind to it and some creativity and off you go.
ReplyDeleteThanks, Linda.
DeleteRhonda,
ReplyDeleteSuch a beautiful mirror and thanks for sharing it at my party. It will be featured at the party on Monday.
Blessings,
Linda