
I had several requests for a how-to on my handmade Santas, Angels, Nativity, and Wise Men that I featured in my Christmas decorations posts.
All of mine were made at least 10 years ago. I made and sold many of the Santas and angels at craft fairs and at my booth in an antique mall when we lived in Jackson.
I miss making them, but the “made in China”, mass produced ones, soon filled the shelves at Wal Mart and Big Lots for a lot less than I could make them for. At that point, I only made them for my special repeat customers who were willing to pay for hand made and also for friends, family, bunco prizes, etc.
The same directions and pattern was used for all of them. Unfortunately, I have lost the pattern pieces. I have made a couple since I lost it, and they turned out fine. I had made so many, that I guess I had memorized it!!
This tutorial is going to require some craftiness on your part and a little trial and error on the clothing part.
First, I will show you some of the ones that I made.


Two of my favorite Santas - Pretty faces are really important!!

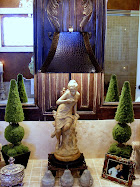
I used burlap, linen, cotton, and fur to dress Mary, Joseph, and Baby.

Her head shawl was a blue cheesecloth type fabric.

A peek under Joseph’s robe and slip reveals his really humble beginning.

This angel got gold antique satin fabric with gold trim.
I used metallic gold paint on the angels hair.

This guy is my favorite.

Santa’s bags can be any shape. I put fringe on the top of this cone
shaped bag and filled it with goodies.
He is wearing a miniature wreath on his head.
This is wavy doll hair that you can purchase at any large craft store.
I use hot glue to apply it…Be Careful! You can shape it and cut it anyway you like.

My Woodlands Santa is dressed in burlap, fringed at the bottom.

I made a pleat in the back of his robe and used mini pine cones and garland to embellish him.
He almost looks real in this photo!

His bag is rectangular shaped with little rustic things inside.
He had a bundle of sticks on this other shoulder.
Here is a list of what you will need
- Styrofoam cone or heavy duty poster board.
- 1” thick
- styrofoam for base
- Santa face and hands ( use leather/suede for gloves if you can’t find hands)
- fabric and trim for clothing
- 16 gauge floral wire (I use heavier plastic coated wire)
- 2” strips of batting
- cheesecloth (I skip the stiffened cheesecloth step)
- fabric stiffener
- toys/embellishments for Santas bag
- hot glue/gun

Just a few of the heads in my craft room.
If you are using faces that are flat on the back and not the full head, you will need to cut a Styrofoam egg in half and glue the face to the flat, cut side of the egg. Put the glue on the face and let it cool a little before you adhere it to the Styrofoam. (The tiny Santa head in the upper right has the Styrofoam glued to the back)
I add a lot of hot glue to the tip to the cone before I push the head onto the body.

Wings in waiting.

And, the ugly truth!!! Yep, this is how he starts out!
You can use a Styrofoam cone, but I prefer using heavy duty poster board rolled into a cone shape, stapled, and taped.
Push it into a piece of Styrofoam to make an impression, remove it, fill it with hot glue, and reposition it into the impression. I also push round toothpicks at an angle, through the bottom of the poster board down into the Styrofoam base for added stability. I use about 4 around the base.

I cut the corners of the base off at an angle and cover the bottom with felt.

I like to use plastic covered wire for the arms. (it’s green, going into his hand in this photo). Cut one length and push it through one side of the cone at shoulder height (about 1” form the top of the cone) and come out the other side. I fill the hands with hot glue and slide them onto the bottom of the wire, holding until set. I also reinforce the holes where the wire enters the body with hot glue.

Starting at one wrist, wrap strips of batting around the arm wire, up to the shoulder, around the back of the neck, and down the other arm. I use spots of hot glue to hold it as I wrap.
The Santa will need batting around his upper body to fill him out.
The original directions calls for cheescloth dipped in fabric stiffener to be wrapped around the batting. I usually skip this step.

They all get a little gathered under slip – glued around the upper body.

I felt like this angels proportions were off, so I added another piece of Styrofoam to the bottom to make her taller.
This photo shows the toothpick trick a little better.

Pretty rough pattern, but it will have to do since I lost the original pattern. You will just have to measure your body and make your pattern to fit. Don’t forget to allow for hems and seams. I use hot glue for the hems and the seams.

My favorite part is choosing the fabric for each one.
Just about everything can be glued together. I find it easier to gather the top of the robe and the slip, and the top of the sleeves with thread, so that I can easily adjust them to fit. I use button craft thread so that it won’t break. Nothing is more aggravating!
I know that these instructions are sketchy, but maybe it will be enough to get you started.
It’s pretty easy to improvise as you go.
If something gets cut too short, add a band of fur or trim. If you cut a hole in the wrong place, glue a toy on it!!!
I will be glad to answer questions if you e-mail me!
One last Santa:

Another pretty face.

And this one is BIG… His body is a tomato cage!
Check out the other inspirational ideas at:


DIY Day Deck The Halls On Tuesday

Today’s Creative Blog
Merry Christmas!
Rhonda


Wow! There is a lot of work that goes into crafting a beauty such as these pieces! The end results are gorgeous- I especially like your personal favorite. Personally, I would much rather have a hand crafted item than a mass produced piece of junk. Hope you have a wonderful holiday season, Rhonda. ~ Sue
ReplyDeleteOh My Goodness Rhonda....Absolutely Beautiful! I would much rather have yours than any mass production. Wishing you and your family a very Merry Christmas and a Happy New Year.
ReplyDeleteGail
I truly admire that you made these, Rhonda! They are very beautiful.
ReplyDeleteMy mom and I use to make angels too. We would sell them at craft shows. Yours are so beautiful!
ReplyDeleteWOW - AMAZING!!!!!!!!!!!!!!
ReplyDeleteMerry Christmas!
Wylie
These are STUNNING!! I think my favorite is the last one, the BIG one! You are incredibly talented!!
ReplyDeleteHave a Merry Christmas!
Lou Cinda
Yay! Your first tutorial!! Oh, I rememeber how mezmerizing it was watching you create these little guys. Maybe you should put a tutorial on how to heal hot glue burns too!
ReplyDeleteI remember searching with you for "the good Santa heads" and not the cheap, plastic looking ones, and how proud I felt when I found one for you...
I think my favorite childhood memories are watching you craft.
Merry Christmas to you my friend and a very happy new year
ReplyDeleteThese are stunning!! You are very talented. I especially love the nativity. So beautiful!
ReplyDeleteMerry CHRISTmas!
Gail
Wow I can't wait to make me a Santa. Thanks for sharing this tutorial. Your Santa's are stunning.
ReplyDeleteMerry Christmas to you and your family.
These are so neat and beautiful!! I have never tried to make one of these but you've inspired me to try! Tomorrow is to be a rainy day, perfect for crafting!Thank you so much for the tutorial and Merry Christmas!
ReplyDeleteBeautiful! I know the hard work that goes into these. You make it look so easy. You're lucky to have such a talent.
ReplyDeleteMerry Christmas!
Kelly
Thank you for the tutorial on your beautiful Santas and nativity figures! I can't wait to get started!! Where do you purchase the heads and hands? I've looked online and don't seem to find any one supplier with a very large assortment.
ReplyDeleteThese are amazing - Such fine craftsmanship. Each one is so beautiful! Thanks for sharing! Happy Holidays!
ReplyDeleteWow that is an amazing tutorial.
ReplyDeleteI am trying to get by for MUCH NEEDED visits.
Merry Christmas,
Cheri
Christmas Greetings, sweet friend...
ReplyDeleteOhh my...your Santa's are gorgeous, Rhonda!!! I can only imagine the work that goes into making these fabulous Santas!!! I sure would like to try to make one...I think that with your instructions that I might give it a try...if I get some time! I noticed that your Santa heads in the box already had beards...was wondering, do you still add the life-like hair, beard, etc. over the top of the other? I really like the life like hair! I have already started looking for Santa heads online...looked on ebay and really didn't see anything. I suppose that Hobby Lobby or a good craft store has them! Anyway, thank you so much for sharing your beautiful hand crafted Santas...and the Nativity as well! I just loved them!!!
I'm just making a few stops today...it's busy, busy time! Hehe! I wanted to come by to wish you and your family a Merry Christmas!!! May the Lord richly bless you and yours throughout the season, my friend!!!
Love ya,
Chari @Happy To Design
WOW, Rhonda! These are amazing! Great job on this- I admire your creativity!
ReplyDeleteyou know I love burlap.
ReplyDelete